Salting is one of the earliest form of preserving eggs.
In days yonder, we used to keep our own chickens and ducks. We would have loads of eggs and my mum would preserve them by salting.
I remember my mum first trying it out ( I am like her, I like to try things). I remember her failing on the first attempt and my dad commented that she should be using a saturated solution. He then made the solution and help to make the eggs!
We salt the eggs in a an earthen jar, and I remember my mum saying it was 21 days or 28 days. Oh, my memory is hazy.
Anyway we ended up with proper salted eggs.
The difference between duck eggs and chicken eggs.
Based on my memory way back…. Well for one, duck eggs are richer and larger. Chicken eggs are smaller. Duck eggs has a ‘fishy’ smell which is not so strong with chicken eggs. We always use duck eggs for the Penang Char Koay Teow, which is fried flat rice noodles. A favourite Penang street food.
OK, the above is based on my memory. So sometimes we recall thing with rose tinted glasses.
For the sake of making salted eggs, I manage to get some local ones sold by a lady who keeps her ducks in her allotment. Sort of like free range.
The duck eggs yolks are yellow, not orange or reddish. And there is no ‘fishy’ smell. I guess our own duck eggs had fishy smell was because the ducks were fed with rice bran, boiled fresh small fish and what ever left-over food we had.
I suppose that was why the duck eggs that I was used to was richer that what we have today. However, I have yet to try other brand of duck eggs. Yes, eggs are now branded!
So I started to salt duck and chicken eggs. I tried many times. I did this old fashioned way with only eggs, salt and water.
The whole thing was at times disappointing as the eggs did not turn out well. Then I tried many times and I realised that the quality of the eggs play a very important part. All the imperfection were recorded in the video. Do view it as it is very long to write. Watching the whole thing unfold makes more sense.
My conclusion is that:
All the eggs are different and we cannot compare one egg to another especially from the esthetics side. This is because the eggs are laid by different birds.
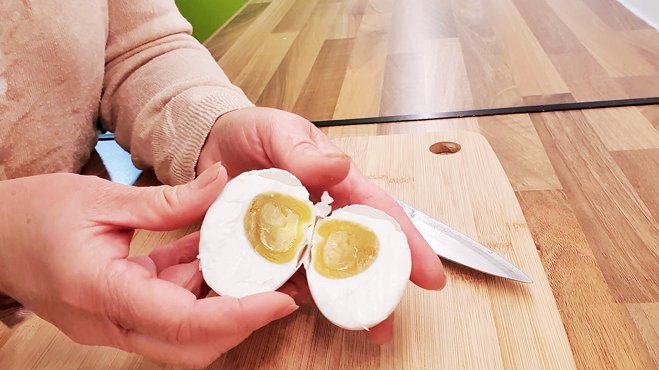
The yolk sacs may break during handling. This affects the appearance and quality of the yolks.
The colour of the yolks are different as the eggs are laid by different birds.
The diet of the birds affects the colour of the yolks, too.
The yolks may have lighter shades and are not uniform in colour. This is ok, it is common and nothing to worry about. I am sure if you have salted your own eggs or bought some, the yolks are not of uniform colour when cut open.
Initially, I was quite upset about it and thought that I am a failure. After many tries, I realised that there is nothing wrong with me, but the nature of eggs.
So, here is the recipe and the story.
I have done another method using spiced brine. I will post it later.
I hope you find this useful and you are not deterred by the ‘funny’ yolks.
Happy salting!
Please like, subscribe and share this post by sending the link instead of copying.
I upload a video every week on You-tube ( unless I am travelling or having to deal with urgent matters)
Please do subscribe to my channel so that you can get instant update.
Thank you.
Here is the recipe.
How To Make Salted Duck and Chicken Eggs
Equipment
- Container to dissolve the salt
- Container to hold the eggs and brine
- Spatula
- Measuring jug
- A plastic bag
Ingredients
- 10 Duck eggs you can use chicken eggs as well.
- 300 g Coarse salt per 1000ml of water
- 1000 ml Hot water or more depending on your container
Instructions
Measuring the water
- Before salting the eggs, place the eggs you want to salt in the container.
- Put in the eggs and fill it with water to cover the eggs completely.
- Remove the eggs and measure the amount of water that is in the container.
- This is the amount of water that is required to cover the eggs.
- When done, clean the eggs and dry them.
Prepare the brine
- Boil some water and put the required amount of boiled water together with the required amount of salt in the basin.
- Mine works out to be about 1 litre, 1000ml. So I used 300g of the salt.
- Stir the mixture until all (almost) of the salt is dissolved.
- You will have a bit of the salt undissolved as we want to get a saturated solution.
- Leave to cool.
Putting it together
- Place the clean eggs back into the container.
- Pour the brine over the sieve into the container.
- Weigh down the eggs with a plastic bag filled with water.
- Lightly cover with the lid and leave to work its magic.
- Rotate the eggs twice a week to make sure that all of it evenly brined.
- Do this by taking out the eggs and putting it back in the reverse position.
- I tested it on day 21, day 28, day 35, 39,45…
Conclusion
- The eggs are done around 40 days. You can salt it for a shorter time of you prefer it to be less salty, like on day 35.
- It is still ok on day 45.
- Once you are happy with the saltiness, remove and store in the fridge in an egg box. It can last for another 2 months or so.
- You can cook the eggs by boiling for 15 minutes or so.
- Or, you can put it in the pot while cooking the rice.
- You can also use it as a filling for moon cakes and to flavour dishes, and make cookies, too.
Video